Easter Egg Crafts for Kids
Fun Hidden in Every One
by Karen & Grace Morris
Did the bunny leave too many plastic eggs? Use them to make Easter egg crafts for kids! The projects will make cute decorations.
Click the pictures to go to the Easter egg crafts for kids of this page.


But don't stop there, come see what will hatch out of paper plates and such.

Let's make some Easter Egg crafts for kids with our leftover plastic eggs.
Eggy Chick
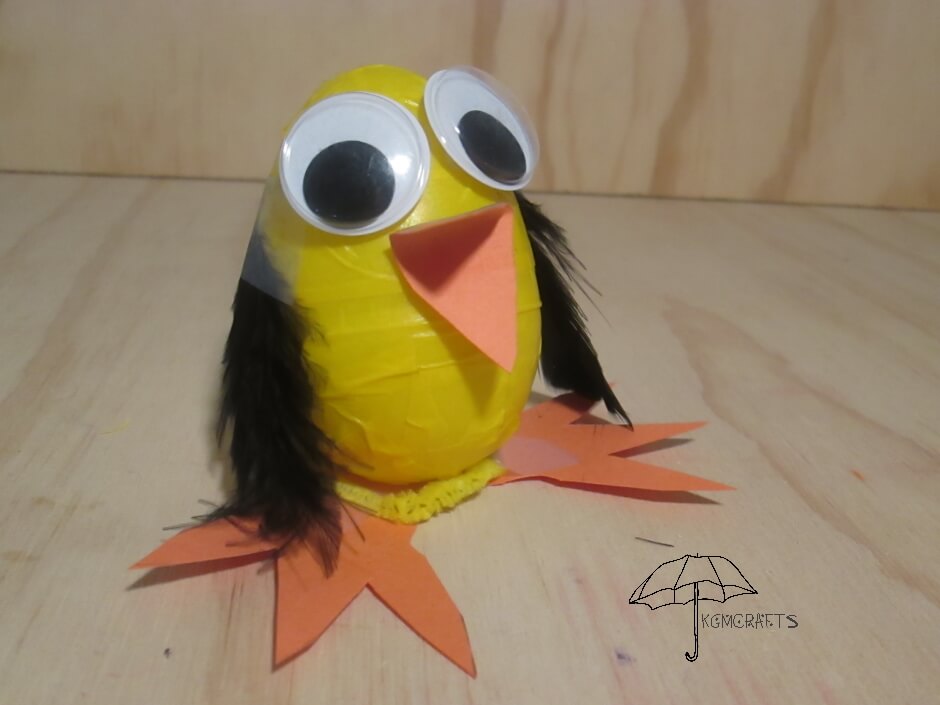
Wait a minute does that egg have legs? And are those little wings?
What You Will Need;
- A jumbo plastic egg
- Yellow Washi tape
- Orange paper
- 2 black feathers
- 2 wiggly eyes
- 12-inch yellow pipe cleaner
- Scotch tape
- Tacky glue

Take your plastic egg and cover it with yellow Washi tape.

Take a 5 1/4 by 2 1/4 inch piece of orange paper and fold in half. From the fold draw to the cut-end. Draw three zigzags. From your last zigzag point draw a line back to the fold so it is 3/4 inches long. Cut out your shape, this will be your chick's feet.

Unfold your chick's feet. When you unfold it, you should have two identical feet attached to each other.

Cut your pipe cleaner 5 1/2 inches. Take your egg and wrap the pipe cleaner around the wide bottom part. Take it off and twist the ends of the pipe cleaner together. Tape the pipe cleaner so the hole sits on the center of the chick's feet. This will allow it to sit on the feet without falling over.
Glue the two wiggly eyes near the narrow end of the egg. Let dry.
Take a 2 by 3/4 inch piece of orange paper and fold in half. Cut out a triangle shape to make a beak. Tape with Scotch tape or glue the beak between and below the eyes. If using glue, make sure you let it dry!
Take your two feathers and trim them down so that they measure 2 1/4 inches. (You might also need to trim the feathers sides as well). Tape to the sides of the egg so that they drag on the ground a little.
Place your chick on the pipe cleaner stand.
Is It Made Form Real Gold?

Congratulations! You found it! (Actually, all the Easter egg crafts for kids are special. =D)
Who says we need a goose to lay a golden egg? Let's go make our own!
Supplies;
- Plastic egg
- Yellow paint
- Paper plate
- Toilet paper roll
- Paintbrush
- Gold glitter
- Washi tape
Make sure you first cover your work area! Paint and glitter are very messy!!!

Cut your toilet roll so that it is 1 1/2 inches tall. Place on top of your paper plate. (This will be a stand for your egg to make it a little easier to paint. But don't throw it away when you're done! You will decorate it later.) Place your egg on top of the paper roll.
Pour some yellow paint on the paper plate.

With your paintbrush paint your egg but don't paint the bottom. While the paint is still wet, sprinkle the glitter on it, until it has a thick coat. Let dry. When your it is dry, flip and paint the other side. Sprinkle with more glitter. Let dry.

After your it has dried, take it off the toilet paper roll. Using Washi tape, decorate the paper roll. Place the golden egg on top.
Foil Covered Plastic Egg

Ohhh, ahhh, so shiny! Look at all the colors!
You Will Need;
- Foil 14 x 6 inches
- Permanent markers
- Jumbo plastic egg

Fold the foil in half. Place the egg in the center of the foil. Wrap around so that the ends meet in the center. Fold and twist the two ends so that the foil will stay on. Be careful not to rip the foil.

With markers make dots and squiggly lines on the foil.
Related: bunny made with an Easter egg
Eggs of Plenty
Don't have plastic eggs? Below are some Easter egg crafts for kids that use tissue paper, paper plates, or other materials.
Knock-out Sun Catcher

The best way to catch the sun with an egg is to use the sunny side up.
What You Need;
- White printer paper
- Wax paper
- Yellow, purple, pink construction paper
- Red, green, blue tissue paper
- Pencil
- Glue stick

First, take your printer paper and draw a large egg shape. Cut out.
Trace the shape on the wax paper, cut out.
On the printer paper egg shape, draw different designs. But remember not to draw anything too complicated, as it would be difficult to cut. Also, make sure to draw large designs.
Once your designs are drawn, you need to figure out which designs are going to allow light to shine through and which is going to block the light. Take your pencil and color in the designs that you want to block out the light. Anything else will allow light to shine through. (I did mine in a pattern, light shine, no light, light shine.)
Just in case you make a mistake you can make a copy of your egg with your printer.

Cut out your designs of your egg shape.

Take your tissue paper and by using your printer paper design as a guide cut them. Glue them to the wax paper egg shape using a pattern of green, red, blue, or however you like. Cut the tissue paper the same size as the penciled and non-penciled pieces. It is too difficult to cut it any smaller because tissue paper likes to tear easily. The penciled areas will still block out light anyway after the construction paper gets placed.

Using only the penciled printer paper designs as a guide, cut out your pieces of construction paper. Glue them to the wax paper egg shape using a pattern of yellow, purple, pink, or however you like. Remember to not cover up all the tissue paper, but only the areas that you don't want the light to shine through.
Let dry. When dry hang in a window and see the cool designs.
Paper Plate Easter Egg Crafts for Kids
Let's Hatch a Chick

The outside might be beautiful with colors and patterns. But there is a greater surprise on the inside. A feathery friend who wants to meet you and call you his mama.
Materials You Will Need;
- 2 paper plates
- Bubble wrap
- Paint
- Scissors
- Brad
- Yellow yarn
- Google eyes
- Scrap of yellow or orange construction paper
- Glue

Hold the two plates together and draw an egg shape. Don't cut too much because you want a large egg. The top needs to be a little smaller than the bottom.

Cut three 3 inch circles of bubble wrap.
Take a new paper plate and pour on the colors of paint you would like to use. I don't recommend using any more than three colors (one light and two dark). The colors I used were yellow, blue, and red.
Dab your bubble wrap in the paint. First, you will want to paint a base color on the outside of the top egg. A bright color is ideal. Also, the more your bubble wrap is colored the less your paint designs will look like spots. This is okay for the base color.

Don't use the same piece of bubble wrap in a different color of paint! The wet paint will mix, changing your original color.
Take another piece of bubble wrap and very lightly dab it in a darker paint. Use this piece to make spots all over the base of your egg.

Do the same to the last piece of bubble wrap. Let dry.
When dry, cut in half.
Hold the two halves over each other and on top of the whole egg. Make a hole for the brad. (using a hole punch works, but be careful not to cut too close to the edge.) Trim the top of the egg.

On the inside egg draw a circle. Most of it needs to be above the bottom half of the egg. Leave enough room for legs.
Cover your circle with white glue.

With scissors cut very small pieces of yellow yarn over the glue. Be sure to cover your circle with lots of yarn. Press the yarn into the glue.

Add a dot of glue for the googly eyes.
Cut a square from construction paper. Fold in half and make a triangle. Glue one end to the center of the circle for the beak.
Cut two narrow rectangles with three points at the end for the chicken's feet. Glue under the circle. Let everything dry.
When everything is dry, fold your egg halves over the chick to hide it. Then on Easter, you can surprise your family with the chick that hatched out of the egg.
A Basket Surprise

Instead of putting eggs in a basket, let's make one a basket! It can hold mini Easter chocolates.
Supplies;
- 2 paper plates
- Construction paper at least 2 colors
- Yarn
- Hole punch
- Scissors

Hold two paper plates together and cut out an egg shape.
Fold the pieces from top to bottom and cut slits. Be careful not to cut too close to the edges.

Cut strips from construction paper.

Weave the strips through the cuts on each shape.

Glue the ends of the strips to the plate.

Punch a hole on both ends of the fold line on both plates.
Continue punching holes around the edge of one of the plates.
So that the plates line up, mark the holes that you punched on the other plate.

From the center of the egg sew the two plate together.

Cut another length of yarn. Thread in the center hole. This time just sew on the side. To make the handle wrap the yarn around the first hole at the top of the egg and leave a length of yarn.

Thread the yarn through the hole and the yarn making a slip knot. Continue sewing along the outside edge of the egg. Do the same on the other side.
A Puzzling Egg

Math on a holiday? Before your run off, this is really a fun project. If you don't want to do the math, you can download the free template. By the way, this is like a tangram, shapes that you can use to make pictures. An egg tangram has nine pieces and can make different pictures of birds.
You Will Need;
- White paper
- Ruler
- Protractor
- Pencil
- Craft foam
- Scissors

About 5 1/2 inches from the bottom of the paper draw a horizontal line 6 inches.
In the center of this line draw a vertical line 3 1/4 inches below the line and 5 inches above.

With the protractor on the line, draw a curved line below the line. Flip the protractor and draw a curved line above to make a circle. (The top of the circle is for reference and is not a line to cut on.)

From the ends of the horizontal line draw a line at an angle to the top of the circle. The line is about 4 1/2 inches long to the top of the circle. You have made a triangle. Extend the line another 2 inches beyond the top of the circle.

With the protractor round between the two lines. This is the top of the egg.
Draw curved lines for the sides of the egg.

The last triangle is drawn on the bottom of the horizontal line. Measure down about 1 inch from the center and make a mark. For the sides of the triangle draw a line that is angled about 2 inches long. This is one triangle. Don't cut on the center line.

Cut the egg apart into nine pieces.
If you don't want to do the math for this Easter egg craft for kids you can download a template here.
Now cut the pieces from craft foam and start making birds. Below are some examples.
 an egg tangram bird
 another bird shape
 one more bird sample
Who says eggs were only for hiding? These Easter eggs crafts for kids are proof that cute creatures or decorations can crack open from them.


