Legendary Creation Themed Crafts
by Karen & Grace Morris
Learn what God made. The simple creation themed crafts will provide an overview of what happened on each day.
The projects are perfect for doing a day-to-day study on the first chapter of Genesis.
The kids can make something to represent each of the seven days.
You will find two overview creation themed crafts. Then there is a project for each of the seven days. The pictures will take you to the individual activities on the page.


Genesis 1:1
In the
Beginning
God...

Day by Day Creation Themed Crafts


Overview Creation Themed Crafts
Mini Book
A mini book is one of the simple creation themed crafts that will help your kids remember what happened on each day.

You will need;
- white paper
- color crayons
- Something you can make marks with. I used the end of a metal ruler.
Fold four sheets of paper in half. Cut on the fold so that you have eight sheets, 8 1/2 by 5 1/2 inches.

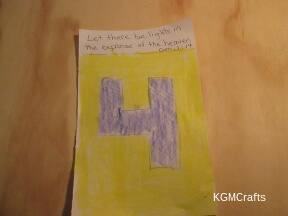
Draw a number one on the first piece of paper. Make the number one 1 inch wide. Color the number black. With a yellow crayon, make lines around the one to look like sparks of light. Write, “Let there be light. Gen. 1:3”

Draw a number two on a separate piece of paper. Cut the two in half using a zigzag line. Using the pieces as a pattern, draw the number on a page of your book. Color the top half of the two a light blue. Color the bottom half a darker blue. Write the Bible verse for Genesis 1:6 and Genesis 1:8 on the top of your page.

On the third page of your book, draw a number three that is 1 inch wide. Color the three blue to represent the water. Color the rest of the page brown. Add trees and flowers or other plants to the page. Write the words of Genesis 1:9 and 1:11 on your page.
For day four, color the four blue. Color around the four with a yellow crayon. Make sure that you press hard and cover the page with a lot of the wax from the crayon.
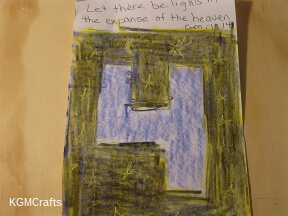
Color over the yellow with a black and blue crayon. With a sharp instrument such as a ruler, etch out a moon, sun, and stars. You should be able to see the yellow sun, moon, and stars through the black.

Draw a five for the next page. You will want to etch some birds and fish on the letter five, so color the bottom half with an orange crayon and the top half with a light blue.
Color over everything with a dark blue crayon.
Etch “m” shapes for birds on the top half. On the bottom, make a triangle attached to an oval for fish.
Color around the five with a blue crayon. Write the words for Genesis 1:20 on your page.

On the sixth page draw a six then add eyes for a man and the animals. Next, write the words of Gen 1:24 and Gen 1:26.

For day seven, draw a seven. Add “zzzz” for God resting. We are finished. Write Genesis 2:2 on this page.
Paper Plate Overview

Another easy to make creation themed crafts.
Supplies;
- 2 paper plates
- Foil
- Scraps of construction paper
- Scissors
- Glue stick
- Markers
- Star stickers
- Brad

Mark the center of both of the paper plates.
Divide one of your paper plates in seven pie shapes.

For day 1 glue a piece of foil on the pie shape.
For the second day, cut one dark blue and one light blue pieces of paper and glue to the next pie shape.
Cove the next pie shape with brown paper. Add green triangles for trees and a blue strip for water.
For day 4 cover your section with black. Add a circle and “C” shape for the sun and moon. Also, add some star stickers.
The next section is blue for sky and water. With a marker, add some “m” shapes for birds. Make an oval with a triangle at one end out of orange paper for fish.
Glue a piece of green paper on the next section. Cut out a man and woman from paper. Add your favorite animals.
On the next section, with a marker, add “Zzz” for God resting.
On the second paper plate, cut out a pie shape that is 4 inches wide at the rim. Square the end of the pie so that you will have enough room to add the brad. Push the brad through the center mark on both plates.
Add the words “The days of creation” on the top plate.
Day by Day Creation Themed Crafts
Teach Genesis to children. Make it fun with these day by day creation themed crafts.
Day 1
God Creates the Heaves and the Earth, Light, and Darkness – Genesis 1:1-5
Do you realize that the light did not come from a bulb, fire, or even the sun? Amazing!
Out of Darkness Light - Jar

What you will need;
- A mason jar
- Black acrylic paint
- Paintbrush
- A battery powered candle

Paint half of the mason jar black. It looks cool if you leave spaces between the brush marks so that the light will shine through the black. Let dry.

Turn on the candle and place inside the jar. Enjoy the light and darkness.
Day 2
God Creates the Atmosphere – Genesis 1:6-8
The Atmosphere Ornament

The Bible gives us a simplified version of what God created. In reality, the atmosphere is something complex. If it didn't contain the types and right amounts of gasses, then it could not have supported life. He gave it layers to later protect us from the sun's radiation.
What you need;
- A clear plastic Christmas bauble
- A white balloon
- Rice
- Funnel
- A straw
- Twine
First, cut the straw into two pieces that each measures 1 1/4 inches. Put aside, but keep it near. You are going to want it later.

Take your ornament and take off the cap. Push your balloon inside. Wrap the opening of your balloon on the opening of the ornament, so you have something like a funnel. Use an actual funnel to pour the rice into the balloon. Remember to pour slowly.
Jiggle it around after each small pour to make sure the rice gets into the balloon.
Use just enough rice. You don't want it to touch the walls of the ornament, but you want it big enough to look like a planet.
Remember, the reason we are not using a green balloon is that God hasn't made the plants yet. And even though there seems to have been water, the sea wasn't made until the third day as well.

Take the balloon off of the opening of the ornament. Very carefully, tie to secure it. However, be careful to not drop your balloon inside the ornament, it is very difficult to retrieve once it is inside!

Cut a long piece of twine. Tie one end of the twine on the end of the balloon where the rice beings. Wrap it several times and tie again. Fold the end of the balloon and tie it down with the twine wrapping it a few more times.

Cut two more long pieces of twine. Hold the center of one piece of twine at the base of the balloon and tie, so you have an end on either side. Make sure it is secure by tying it a few times. Do the same with the other piece so that you now have four loose ends.
Hold your two straws so that the base of your balloon is between them. Take one of the loose ends of twine and thread it through one of the straws. With the same end, slip it into the other straw. Do the same to the other three strings so that there are two ends on each side of the straws.
At one of the straws, sides take the two twines ends and knot them together. Do the same to the other side. Making a triangle that sides are 1 inch above the straws, tie the four ends of twine together. To make an ornament hanger, make a loop that is 1 1/2 inches and then knot the loose ends. Cut the excess twine to finish the world's atmosphere.
Day 3
God Creates Dry Land, the Sea, and Plants – Genesis 1:9-13
Mini Garden

We know that in Genesis 1:2 there was already water. It is only now that God made some of that water into the sea. And the dry land for us to walk about.
On this day God planted beautiful gardens. Gardens filled with flowers, trees, veggies, grass, and everything that grows in the dirt.
Supplies;
- Green paper
- Cardboard (cardboard from a cereal box will work, but thicker is okay)
- Blue tissue paper
- Mixed dried beans
- Toothpicks
- Green bottle caps (the ones from glass bottles are great, but green 7-Up caps will work as well)
- Glue stick
- Hot glue gun
- Something for your toothpicks to lean up against (extra glue sticks work great for this. You don't actually need the glue in the stick, but just the casing.)
Take a whole sheet of your green paper and glue it with a glue stick to your cardboard. Cut your cardboard, so it is the same size as the green paper. This is your land.

Making a whole sea for this craft is a little difficult. But you could make a river or a lake. Cut off the desired length of your blue tissue paper. To make a river, glue with the glue stick in an “S” shape on your land.

Take as many mixed beans and green bottle caps as you like to create rocks, bushes, and hills. Just glue them down on your dry land with your hot glue gun.
Make trees by cutting green triangles from paper and gluing them on toothpicks with the hot glue gun.
Make a dot of hot glue on your dry land. Quickly grab one of your trees and stick the end in the dot of hot glue. Grab something that your tree can lean against (such as a glue stick). Without bumping your tree, repeat the process until you have the desired number of trees. When one of the dots of hot glue has dried, you can move the object the tree was leaning against to another tree that needs it. When the whole thing is dry, you can remove all of your objects. Your trees should stay upright.
Day 4
God Creates the Stars, Planets, and Moons – Genesis 1:14-19
The Solar System

This must have also been the creation of time. As it even says in Genesis 1:14 “And let them be for signs and for seasons, and for days and years.”
What you will need;
- Four sheets of black paper
- Poster-board
- Glue stick
- One large orange or yellow pompom
- Nine rocks (You will want different sizes. Four rocks that are around the same size, but not too close. Four rocks that are larger than the other four. And one smaller one.)
- Acrylic Paint (planet colors)
- Foam brushes
- Paintbrushes
- Card stock
- Brown marker
- White crayon
- Star stickers

Clean your rocks as best as you can.

To make Mercury, take your second-smallest rock. Paint it gray with a sponge. In the pictures, I am using a sponge to try to make craters. Though because of the roughness of the rock, it doesn't matter if you use a sponge or not. A foam brush will work just as well.

To make Venus, take your fourth-smallest rock. Paint it with a foam brush, alternating between orange and yellow. Venus actually looks like it has a whitish color because of its surface clouds. But the surface is much cooler to paint with its orange and yellow colors.

To make Earth (that's your planet!), take your fifth-smallest rock. With a brush, paint green continents. It doesn't have to be exactly like the real Earth. It can be difficult to draw every continent on a small rock. Then paint the ocean blue.

To make Mars (that's where I live!), take your third-smallest rock. Paint one side a dark red with a foam brush and paint the rest a bright red.

To make Jupiter, take your largest rock. Paint white and brown strips with a brush.

To make Saturn, take your second-largest rock. Paint it light brown color with a foam brush.

To make Uranus, take your third-largest rock. Paint it a very light blue that is almost white with a foam brush.

To make Neptune, take your fourth-largest rock. With a foam brush paint it blue (my favorite color!!!).

To make Pluto, take your smallest rock. With a brush, paint with a thin layer of white and brown paint giving it a nice texture.

To give Saturn a ring, place it on your card stock. Draw around the rock.

Around that circle, draw a 1-inch ring. Color the ring a light brown color that is close to what you painted Saturn with a marker. (The ring will look kind of like a doughnut). Cut out the ring and the center so that it would fit snugly around the rock.

Attach the ring to it by putting the rock through the hole until it won't fall out.

With the glue stick, glue all the black pieces of paper to the poster-board and let dry.
Place the pompom in the center of where all the corners of the black paper met. This will be the sun.
Place your planets on the black paper. Mercury is closest to the sun and Pluto farthest from the sun.
With your white crayon draw the orbit paths of the planets. All the planets have a large oval around the sun. Except for Pluto which intersects its path with all the planets orbits.
Take your star stickers and stick them all over your solar system.
Related: Space Crafts for Kids
Day 5
God Creates Fish and Birds – Genesis 1:20-23
Clay Fish & Birds

Both the skies and the waters were filled with the first creatures. Penguins, parrots, chickens, ducks, doves, seagulls, and crows. Goldfish, catfish, sharks, angelfish, trout, salmon, and bass were created.
What you will need;
- Air dry clay
- Blue straws
- Blue paper
- Blue tissue paper
- Cardboard
- Glue stick

Cut your straws so that they are approximate 4 inches each. Make sure that you are not exact though. For this craft, it is good to have different sized straws. Please note that you will want the number of straws as the number of birds you plan on making.

Take your blue paper and glue it with the glue stick to the cardboard. Take your blue tissue paper and glue with a glue stick all over the blue paper to make the waves in the water.

First, take your clay and start modeling it into fish and birds. You don't want to use a lot of clay to make them, as you have limited space on your paper.
To make a fish, take a small piece of clay and model it into a narrow oval. This is the base of your fish. Take a tiny piece of clay and roll it until it is a small snake shape, then bend it into a “V” and attach it to the bottom of the base of your fish. This is the fish's fins.
To make the tail, flatten another small piece of clay, carve the end making two triangles. Attach the tail to the end of the base of your fish. An optional step is to make little dots of clay and attaching them to the fish for spots.

To make a bird, take a small piece of clay. Mold it so that the ends are narrow and the center is more round. This is the bird's base. Take a very tiny piece of clay and make it into a triangle shape to make a beak. Attach the beck on one of the ends of the bird's base.
Take another small piece of clay and roll it so that it is a snake shape, blending it slightly to make wings. Attach the wings to the bottom of the bird's base.
You don't want to make too many, as too many would make it too crowded. I found that a good number to start with is three birds and three fish.
Take each bird you have made and carefully stick a straw through the center of the body. On the other ends of your straws, form your extra clay into flat surfaces. This way when the clay dries it will make a stand for each of the birds.
Allow some time for your clay to become hard. On the brand of clay that we used it said that it can take 72 hours for the clay to harden completely depending on the thickness of the piece. When harden, you can continue with your craft.

Take your bird stands and place them randomly all over the blue paper. Now your birds are in the sky!
Place your fishes in the desired places on the water, enjoy.
Find more birds crafts here.
Day 6
God Creates Animals – Genesis 1:24-25 – and Man – Genesis 1:26-31 & Genesis 2:4-7
Creation Parade

On the sixth day, God created all the animals which breathed air. This would include a ton of different animals. Such as puppies, kittens, bunnies, cattle, sheep, horses, spiders, ants, and worms. You name it, God made it.
God also made man on this day.
Supplies;
- 1 sheet of paper
- Something to color the animals and people (crayons, markers, or colored pencils)
- PDF of the Creation Parade


Color the animals and people. Even though the picture shows the animals and people cut out, it is easier to color first then do the cutting.

Cut along the outside lines of the parade.

Fold to cut out the spaces, but don't cut out the individual animals. You want it to be like a chain.
Related: Animal page
Day 7
God Rests – Genesis 2:1-3
A Bed for God

God probably doesn't get sleepy. Neither does He need to rest. As it says in Isaiah 40:28 God neither “faints nor is weary”.
Regardless, God made the seventh day of the week special, holy, because He rested on that day. It doesn't state that He was tired, but more like He ceased from creating from that day. He saw His creation as “very good” in Genesis 1:31.
What you will need;
- Five Jumbo craft sticks
- Fifteen regular size craft sticks
- Hot glue
- Mod Podge
- Two sponges 4.7 IN x 3.0 IN x 0.6 IN each
- Red and white fleece
- White thread and needle
- Black marker

First, you will want to cover your work area with newspaper. Take your jumbo craft sticks and hot glue them side by side. This is the bed's base.
To make your bed's legs, take two regular size craft sticks. Hold one of them flat and the other one pointing up. Hot glue them together. Hot glue one of its ends to a corner of the base of the bed. Continue until you have four legs.

Flip your bed over. On each of the two long sides and one of the short sides of the bed base, hot glue one of the regular size craft sticks on their sides.
On the other short side, hot glue four of the regular size craft sticks on top of each other. This will be the headboard.

With a paintbrush, paint mod Podge all over one of the sides of your bed frame. Be sure to cover it evenly and to cover all the cracks. Mod Podge with make your bed frame stronger and make it nice and shiny. Let dry. When dry, flip the bed and paint this side with Mod Podge as well. Let dry.

When dry, flip your bed over so that it is upright. With a black marker write on the headboard “Day 7 God Rests”.

Take one of your sponges (yellow is a good color for this) and place it on the bed frame. This will be the mattress.
Take your other sponge (purple is a good color) and cut it, so it measures 1 by 2 3/4 inches. This will be a pillow. Place on the mattress on the front of your bed near the headboard.

To make a blanket, cut a 10 by 3 3/4 inch piece of red fleece. Fold 1/2 inch on the short side. Cut a 1 by 5 1/2 inch strip of white fleece. Sew it on the folded end of the red fleece, so the folded end can't be lifted anymore. Wrap the red blanket around the mattress.
We are beautifully and wonderfully made, by an awesome God. How great thy art, how great thy art! We can capture God's beautiful painting by recreating it with creation themed crafts.


